NAME- How to manage books at library using Arduino UNO and RFID
You’ll need-
1. Arduino UNO
2. MFRC-522 RFID Module (https://bit.ly/2Zp9Teo)
3.
7 male to female jumper wires
And you should be good to go :D
Tip- if
the RFID card reader is not soldered to the pins, it’s helpful to get it
soldered from any electronics servicing
store. It’s not a must but it’s helpful.
Note- If
you want to buy additional tags or cards, make sure to read the description of
the module and check out the frequency used by the module. For our reader, you’ll
need to buy 13.56MHz cards and tags.
How does it work-
when the book’s card area is hold against the reader, the reader will add the
book on the list according to the next available position. Later, anyone can
check the list for their desired book and find out where it is.
How to make it-
1.
First you have to connect the pins as shown below.
Module pins
|
Arduino pins
|
GND
|
GND
|
3.3 V
|
3.3 V
|
RST
|
9
|
MISO
|
12
|
MOSI
|
11
|
SCK
|
13
|
SDA
|
10
|


2.
Download the MFRC522 library from (https://bit.ly/2OZNZJR) and add it to your
libraries folder in Arduino (check YouTube if you need help with how to do it, if I make
a tutorial, I’ll add the link)
3.
Open the Arduino IDE and go to
File>Examples>MFRC522>DumpInfo and select DumpInfo.
4.
Upload the code and open the serial monitor. If the
text is similar to the picture below, the connection is working perfectly. If not,
check the connections again.

Note-
You can also scan the cards here to see if it’s working.
5.
Now, open a new sketch(new file in arduino) and
paste the code below
#include <SPI.h>
#include <MFRC522.h>
#define SS_PIN 10
#define RST_PIN 9
int r;
int s;
MFRC522 mfrc522(SS_PIN, RST_PIN);
void setup() {
Serial.begin(9600);
SPI.begin();
mfrc522.PCD_Init();
r= 0;
s= 1;
}
void loop() {
int
a;
int
b;
String
id1="";
if
(mfrc522.PICC_IsNewCardPresent()&&mfrc522.PICC_ReadCardSerial()) {
for
(byte i = 0; i < 4; i++) {
unsigned long id = (mfrc522.uid.uidByte[i]);
id1 =id1 + " "+id;
}
Serial.print(id1);
Serial.print("\n");
delay(500);
}
}
6.
Upload the code and open the serial monitor. Scan
the cards or tags, you should get outputs like in the picture below.

7.
Now open a new sketch (new file in Arduino) and
paste the code below
#include <SPI.h>
#include <MFRC522.h>
#define SS_PIN 10
#define RST_PIN 9
int r;
int s;
int p;
MFRC522 mfrc522(SS_PIN, RST_PIN);
void setup() {
Serial.begin(9600);
SPI.begin();
mfrc522.PCD_Init();
r= 1;
s= 1;
}
void loop() {
int
a;
int
b;
int
x;
String
id1="";
if
(mfrc522.PICC_IsNewCardPresent()&&mfrc522.PICC_ReadCardSerial()) {
for
(byte i = 0; i < 4; i++) {
unsigned long id = (mfrc522.uid.uidByte[i]);
id1 =id1 + " "+id;
}
if(id1==" 210 147 148 27"){ //change the id in the if function
with the 1st id you got from the previous code
x=place();
a=row();
Serial.print("book 1 is at place= ");
Serial.print(x);
Serial.print(" ; row= ");
Serial.print(a);
Serial.print(" ; shelf= ");
b=shelf();
Serial.print(b);
}
if(id1== " 7 209 162 38"){ //change the id in the if function
with the 2nd id you got from the previous code
x=place();
a=row();
Serial.print("book 2 is at place= ");
Serial.print(x);
Serial.print(" ; row= ");
Serial.print(a);
Serial.print(" ; shelf= ");
b=shelf();
Serial.print(b);
}
Serial.print("\n");
delay(500);
}
}
int place(){
p=p+1;
if(p==10){
r=r+1;
p=1;
}
return p;
}
int row(){
if(r==6){
s=s+1;
r=1;
}
return r;
}
int
shelf(){
return s;
}
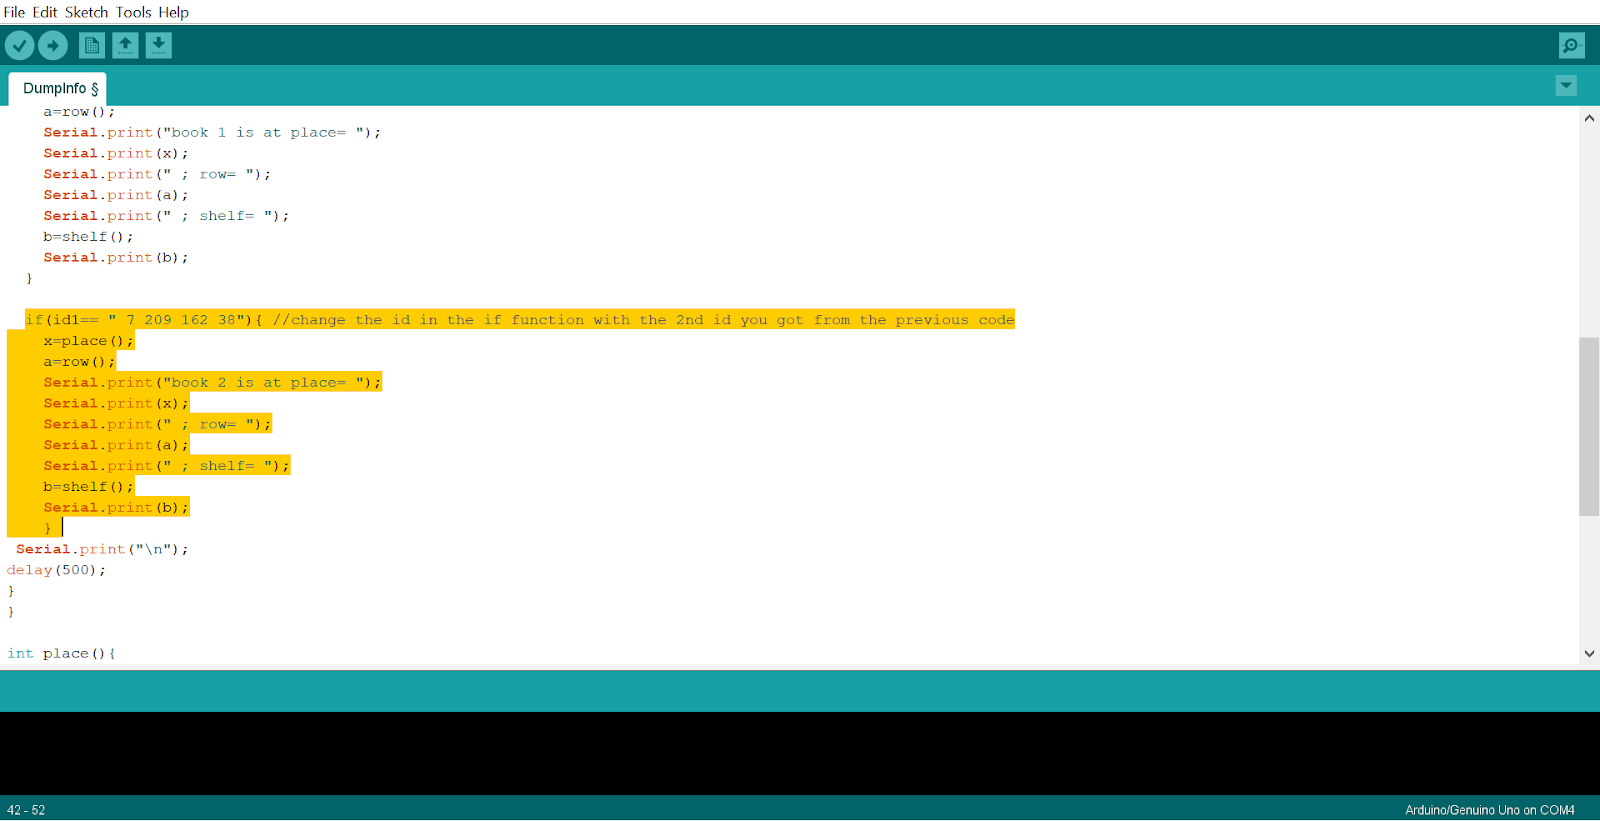
8.
Copy the ids you got from the previous code and
swap the ids in the if condition in the new code.
9.
Upload the new code and open the serial monitor.
Scan the cards and tags. It should look like the picture below.

Congrats! Your project is done! Now you can present it to
your teacher and get the marks :D
Note- if
you want to add more books and got more tags and cards, you copy and paste the
highlighted part in the picture below and change the id and book name
accordingly.
No comments:
Post a Comment